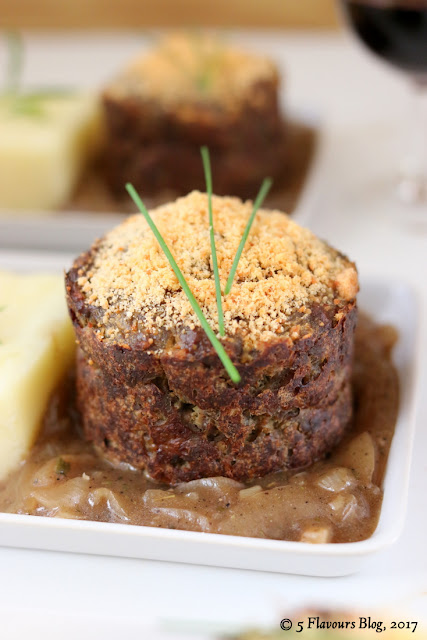
Ground Beef Liver Towers
With Browned Onion Gravy & Mashed Potatoes
Cooking The Dark Side ...
– JUMP TO RECIPE –
– PRINT RECIPE –
The legendary combination of liver (in ground, strip or cutlet form),
sage and sharp apple is as old as the mountains and just as established. Despite
their antiquity, they are still an exciting troika,
and in this easy recipe vastly tame – and improve – a much reviled and dreaded
old dinosaur: Liver Cakes.
To combat the often dry and dense structure and frequently dank,
overbearing taste of traditional, pan fried
Liver Cakes, we significantly ‘dilute’ the ground beef liver with some
ground pork (which co-incidentally adds a bit of texture) and moisten and
lighten the texture with grated onion and apple. Baking the entire shebang eliminates
the greasiness resulting from pan frying in shallow vegetable oil and returns
nutritious healthiness.
Dried sage – with it’s pronounced and almost pine-like, musty character
– is ideal for dense, sweetish-savoury foods that will benefit from it’s bitter
finish and domineering character. It practically demands usage in savoury stuffings,
pork sausages, certain meat dumplings and heavy meat stews. Beef liver, with
it’s rich, characteristically metallic taste, matches particularly well with the
‘dark’ bitterness of sage. Fight fire with fire!
The uncooked, ground liver mixture is very soft and cannot readily be
formed into patties or ‘cakes’ for frying or grilling, nor would I try frying
it. The mixture requires baking and does so particularly well. Use a cake tin
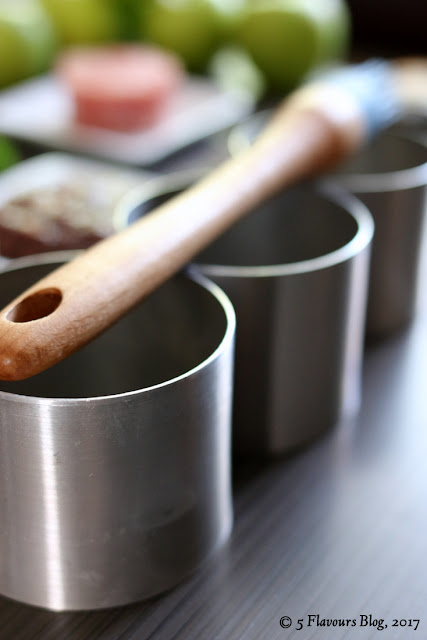
(to produce wedges), a rectangular oven dish or muffin pans. I used stacking
rings here as it produces an unusually shaped product particularly suitable for
a semi formal dinner or supper. Serving the baked liver with sweetish, browned
onion gravy takes up any overall slack in the moistness department while creamy
and rich potato mash smooths out the flavour profile and texture in the mouth.
Maxima per os...
The nature and benefits of liver were discussed in Beef Liver with Caramelized Onions & Balsamic Reduction.
Recipe yields:
6 Large portions
|
Preparation time:
± 25 minutes
|
Baking time:
35 min
|
Difficulty level:
Easy
|
Special Equipment Required:
6 x Metal stacking rings, 70mm in diameter, or
1
x Standard, 12-muffin pan (recipe yield will increase to 9 units).
Ingredients:
Ground beef liver
|
500g
|
Ground pork
|
125g
|
Tart cooking apple, e.g. Granny Smith, peeled & grated
|
1 medium
|
Yellow onion, peeled &
grated
|
1 medium
|
125g
|
|
Cake / General Purpose
flour
|
45ml
|
Worcester sauce
|
30ml
|
Garlic, chopped
|
15ml
|
Salt
|
10ml
|
Dried sage
|
7.5ml
|
Fresh parsley, finely
chopped
|
5ml
|
Fine black pepper
|
± 1ml
|
Egg
whites from extra large eggs
|
2
|
Grated Parmesan cheese
|
60ml
|
Method:
- Combine the grated onion and apple. Using a sieve or folded, clean dish cloth, press or squeeze the grated onion and apple very well to remove as much juice as possible.
- Combine the onion and apple with all the other ingredients and mix thoroughly with a metal spoon. Allow the mixture to rest in a refrigerator for 30 minutes before use.
- Coat the inside of the stacking rings (or muffin pan cups) thoroughly with a thin film of oil or cooking spray. Paint a film of oil on the inside of a suitably sized baking or oven tray. Place the stacking rings upright and evenly spaced inside the baking or oven tray.
- Divide the liver mixture evenly between the stacking rings and level the surface while pressing down gently to eliminate any air pockets.
- Divide the grated parmesan cheese between the filled rings, sprinkling the cheese evenly over surface of each filling.
- Bake 30 minutes at 165°C (365°F) in a pre-heated convection oven.
- Remove from the oven, allow to cool 5 minutes and use a thin, narrow bladed spatula to loosen the baked filling from the sides of the stacking rings. Unmold and transfer to warmed plates.
- Serve immediately with Browned Onion Gravy and creamy Mashed Potatoes.
Comments:
- The individual baked liver towers freeze very well.
Browned Onion Gravy
Unctuous,
sweetish-savoury, and with soft strands of onion voluptuously weaving through
the deliciously browned gravy liquid with it’s faint herbed undertone. An
excellent foil for liver’s tendency to loom overbearingly.
In
my opinion commercial, fine black pepper works better than pungent and
domineering freshly ground pepper in this recipe. The objective is to achieve a
uniform, unobtrusive accompaniment that will smoothly support, but not detract
from the main event, whether it be beef liver or grilled rump steak
BROWNED ONION GRAVY
– PRINT RECIPE –
Recipe yields:
6 Portions,
± 500ml
|
Preparation time:
± 15 minutes
|
Cooking time:
25 min
|
Difficulty level:
Easy
|
Special Equipment Required:
1
x Large sauce pan, with lid
Ingredients:
Medium yellow onions,
peeled and thinly sliced
|
2
|
Sunflower or neutral
vegetable oil
|
30ml
|
Butter
|
15ml
|
Balsamic vinegar
|
30ml
|
Beef stock powder
|
10ml
|
Warm water
|
350ml
|
Corn flour / Corn starch
|
10ml
|
Mixed herbs
|
5ml
|
Mustard powder
|
2.5ml
|
Salt
|
2.5ml
|
Fine black pepper
|
± 1ml
|
Cold water
|
30ml
|
Optional: Cold butter to finish the gravy
|
15ml
|
Method:
- Melt the oil and butter in a large saucepan over medium low heat. Make sure the butter does not burn.
- Add the thinly sliced onions to the pan, stir thoroughly to coat all the onions with oil and cover with a lid. Cook slowly for ±10 minutes or until the onions are soft and translucent. Stir frequently to prevent the onions from catching or burning. Keep the pan covered during the cooking and do not brown the onions.
- Add the balsamic vinegar and stir well to coat the onions. Cover again with the lid and continue to cook for a further five minutes, still covered, again making sure contents do not catch and burn.
- Add the beef stock powder to the warm water, stir very well and add it to the pan. Mix and allow the contents to reach simmering point. Simmer uncovered for 5 minutes.
- Combine al the remaining ingredients in a heatproof bowl. Mix thoroughly, using a fork or whisk, to create a thin, lump-free slurry.
- Pour a little of the hot gravy onto the starch mixture and combine. Pour the starch mixture back into the gravy. Increase the heat to medium and boil gently, stirring (and scraping) the pan regularly, for 3 – 5 minutes or until the gravy is thickened.
- Optional: stir in the cold butter to give the gravy a glossy surface finish.
- Season with extra salt and pepper, if necessary, and keep warm until ready to serve.
Comments:
- Cut the onions into quite thin slices, but with an even thickness. This will ensure fast, even cooking.
Mashed Potatoes: Some Thoughts
According
to the esteemed Jeffrey Steingarten of The
Man Who Ate Everything fame, truly excellent mashed potatoes are “an
escapade in animal fat”. His well researched, but rather obsessively detailed
article makes it clear that free, cooked starch is the true enemy of an exalted
mash. I find that quite ironic given that we are working here with, well ...,
the potato.
The
reasoning is: The starch in the cells swells and gelatinizes during cooking when
the potato tissue reaches ± 71°C / 160°F. At higher temperatures, nearer to
boiling point, the pectin that acts as the cement between plant cells degrades,
making it possible to mechanically separate the majority of the cells intact.
The idea is to prevent the cooked cells from breaking open during separation (mashing)
and spilling their sticky, glutinous starch gel into the mash, thereby turning
our masterpiece into a stodgy and sticky disaster. The optimal temperature for
achieving cell separation is ± 82°C / 180°F. Pectin increasingly regains it’s function the
further the internal temperature falls below this level. The trick therefore lies
in the successful separation of hot, intact potato cells during the mashing
process.
Mr.
Steingarten suggests (and found by his own experimentation) that smooth, fluffy
mash requires freshly boiled and drained potatoes to be passed through a potato
ricer while still as hot as possible. A potato ricer allows for minimal
mechanical manipulation of the hot potato tissue while efficiently separating
the cells intact. He emphatically advises against the use of food processors,
food mills, blenders (including the blending ‘stick’ so beloved of the soup
crowd) or mashing by fork.
Now
I don’t own a potato ricer (I don’t eat mash all that often), but I suspect a
hand masher with large openings on the mashing plate – applied slowly, yet firmly – will achieve
a nearly similar effect. The trick comes in keeping the entire assembly hot
while doggedly mashing away...
Honourable
Steingarten then prescribes a specific order in which the enrichments for serious
greatness should be added, to wit:
- As soon as possible, incorporate a truly hefty quantity of cubed, room temperature butter into the mash, to the order of ± 150g per kilogram of mash, or – for my American readers – 1½ sticks butter per 2 pounds of mash.
- Then, and only then, do we add the hot milk or cream over low heat until the desired consistency is achieved, from stiff to runny.
Got
it? Who said simple things are easy?
Sources:
1. THE MAN WHO ATE EVERYTHING;
Steingarten, Jeffrey; Vintage Books (Random House); New York; 1998.
2. THE FLAVOUR THESAURUS; Segint,
Niki, Bloomsbury Publishing; London; 2010.
© RS Young, 2017
– RECIPE INDEX PAGE –
Follow Me on Facebook
Note:
Post
updated on 2024.03.18 to include:
1.
The updated Recipe for downloading as a PDF file, and
2.
Recipe Title and Print Recipe, Recipe Index and Facebook & Pinterest follow
links.


Comments
Post a Comment